Xbox 360 Lite-On DG16D2S Extract Key
In later August 2008 a method to dump the new Lite-On DG16D2S drive was released. It requires a serial controller and SATA controller to dump the key.
Thanks goes to Geremia, C4eva, Tiros, Schtrom, TMF, Redline99, and the Xbox-hacker community.
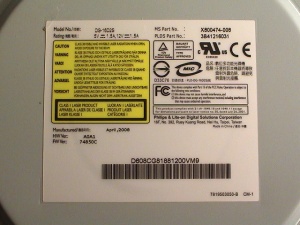
Lite-On DG16D2S
This drive started to appear in machines manufactured after 20th April 2008 (2008-04-20). Currently it's not possible to dump or flash the drive, only extracting the key.
Serial Adapter
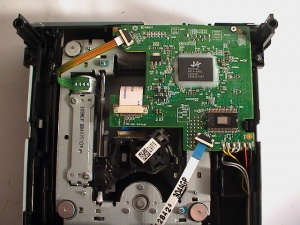
The serial adapter will be connected to the Lite-On drive board and used to interface with the MT1319L controller using the DVDKey utility (more below).
Build
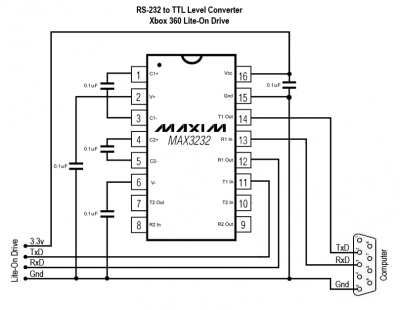
Either buy a pre-built RS-232 adapter or build one yourself. The parts are cheap and it isn't hard to build.
Some RS-232 transecivers:
- MAX3232
- ST3232
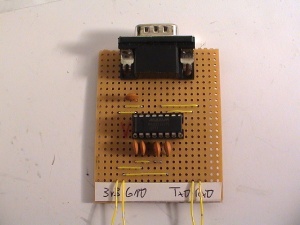
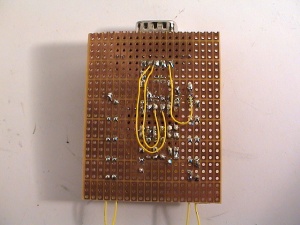
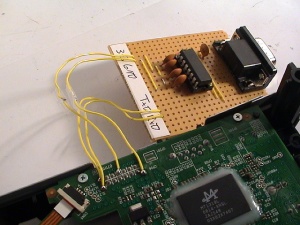
Here is my adapter based on a MAX3232 chip:
To verify that the serial adapter works, make sure the serial-port is enabled in the BIOS, and join (loop) the Tx and Rx pins together (pin 2 and 3). Open HyperTerm (or any other terminal applications) and try the default settings (9600, 8, None, 1). Type something in the terminal, it should echo back what you typed if it's working.
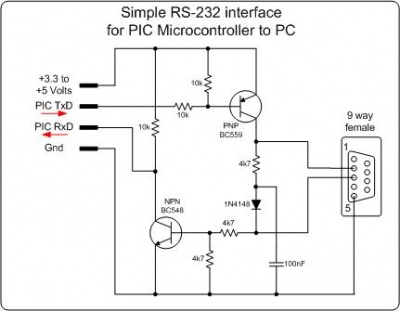
Alternatively, try this very simple RS-232 level converter. Composed of only resistors, diodes, transistors, and a capacitor.
Links:
Connect
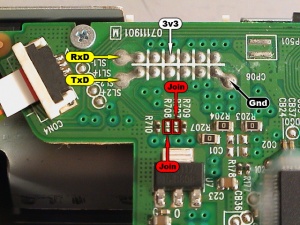
Once the serial adapter is ready, connect the 3.3v, Ground, TxD and RxD points to the Lite-On drive board. There is also two jumpers/solder pads for TxD and RxD that needs to be joined. The points are shown below:
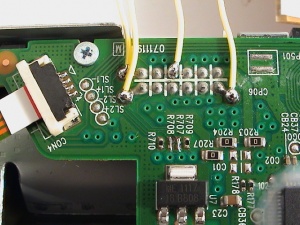
The adapter installed:
Dump Preparation
Requirements
These are the basic requirements to connect the drive to a computer and powering it.
- Native SATA controller or VIA VT6421A or VT6421L PCI card
- Power to the Lite-On drive, either:
- Team Xecuter Connectivity kit v1 or v2
- The Xbox 360 located close the computer to provide power
Utility
Download the DVDKey utility. The utility will interface with the drive over the serial connection and dump the key via SATA.
Create a DOS boot disk and put DVDKey on the drive.
Find SATA Port
DVDKey requires the address of the SATA port where the Lite-On drive will be connected. The address location is in HEX format (e.g. 0xA000 or A000).
Currently there are 3 different methods to find the address, some easier than others.
iPrep
This is a Windows tool to create a boot disk for iXtreme flashing.
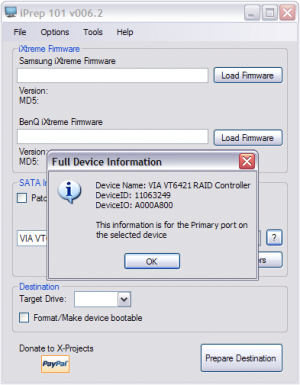
Install the application and open it, in the middle of the window, look for the name of your SATA controller, click the question mark on the right-side, the SATA port is the first 4 (four) characters in the DeviceIO string. Here it's A000.
Make sure you have the .Net Framework v2.0 installed if the application throws an error on launch.
DosFlash
DosFlash is used to flash BenQ drives (and Toshiba-Samsung drives). It will report the address of the detected drive before it continues.
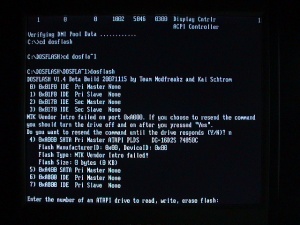
Connect the Lite-On drive to the SATA port, create a DOS boot disk and put DosFlash in it, boot to DOS, and execute dosflash.exe in the Dosflash16 directory (DOSFLA~1). Press n on any prompts. The port will be reported in the text string starting with MTK Vendor Intro failed on port.... Press ctrl+c to exit.
The output should look like this:
c:\DOSFLASH\DOSFLA~1>dosflash
DOSFLASH V1.4 Beta Build 20071115 by Team Modfreakz and Kai Schtrom
 0) 0x01F0 IDE    Pri Master   None
 1) 0x01F0 IDE    Pri Slave    None
 2) 0x0170 IDE    Sec Master  None
 3) 0x0170 IDE    Sec Slave   None
MTK Vendor Intro failed on port 0xA000. If you choose to resend the command
you should turn the drive off and on after you pressed "Yes".
Do you want to resend the command until the drive responds (Y/N)? n
4) 0xA000 SATA   Pri Master   ATAPI PLDS   DG16D2S 74850C
     Flash ManufacturerID: 0x00, DeviceID: 0x00
     Flash Type: MTK Vendor Intro failed!
     Flash Size: 0 bytes (0 KB)
5) 0xA400 SATA   Pri Master   None
6) 0xA800 IDE     Pri Master  None
7) 0xA800 IDE     Pri Slave   None

Enter the number of an ATAPI drive to read, write, erase flash:
c:\DOSFLASH\DOSFLA~1>
Picture:
Slax Linux
Slax is a Linux distribution tweaked for Xbox 360 use. It will put the Hitachi-LG drive in mode-b for flashing.
Connect the Lite-On drive to the SATA port, burn the image to a CD-R/DVD-R, boot the disc, eject the tray if the boot halts, and login using username root and password toor.
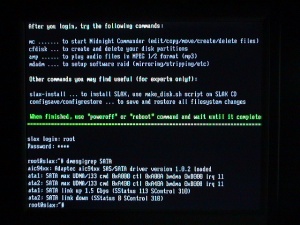
Type dmesg|grep SATA' (case important, SATA)' to filter out the SATA messages from the kernel boot log. The SATA port address can be found after SATA max UDMA/133 cmd, before ctl. In this example 0xA000, or A000 is the part that will be used here.
The output should look similar to the below:
root@slax:~# dmesg|grep SATA
ata1: SATA max UDMA/133 cmd 0xA000 ctl 0xA00A bmdma 0xB000 irq 11
ata2: SATA max UDMA/133 cmd 0xA400 ctl 0xA40A bmdma 0xB008 irq 8
Picture:
Dump Key
Once the steps above is complete, the dump process can begin.
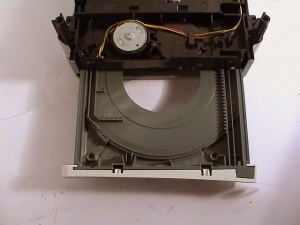
Half Open Tray
The tray has to stay half open during the process. Once the drive tray is half-open it will stay open, not close on the next power up as a normal drive would do.
Note: On some setups it's not needed to have the tray half-open, it works fine with the tray closed.
Eject button method
- Power on the drive
- Press the eject button - On the Connectivity Kit or front of the Xbox 360
- Remove the power again
- Manually press the drive half-way in
Paper clip method
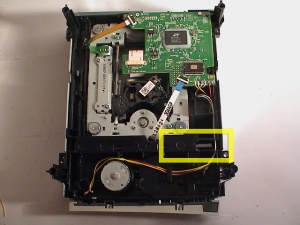
- Locate the black slider on the right-side on the bottom of the drive (see picture)
- Use a paper clip or screwdriver to press the slider all the way in
- The tray should slide or pop out, pull it half-way open
Dumping Procedure
Follow this procedure to dump the key:
- Power off the computer
- Disconnect power and SATA cable on the Lite-On drive
- Connect the serial controller cable to COM1 (bios setting 3F8/IRQ4) on the computer
- Connect power to the Lite-On drive
- Power on the computer
- Boot to DOS, either from hard drive or a flash drive, DVDKey already installed
- Plug in the SATA cable to the Lite-On drive
- Note: On some computers (VT6421), the cable can be plugged in before the computer is powered on
- Execute DVDKey with the SATA port address (found above) as an argument:
- dvdkey a000
- After 20-30 seconds the key will be dumped
- If it fails, try again from step 1
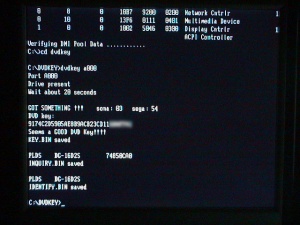
The output should be something like this:
c:\DVDKEY>dvdkey a000
Port A000
Drive Present
Wait about 20 seconds

GOT SOMETHING !!!    sona: 03   sega: 54
DVD key:
9174C2D5905AE8B9ACB23CD116XXXXXX
Seems a GOOD Key!!!!
KEY.BIN saved

PLDS   DG-16D2S      74850C
INQUIRY.BIN saved

PLDS   DG-16D2S
IDENTIFY.BIN saved

c:\DVDKEY>
Picture:
Errors
If you got something like this, you need to:
- Power down the drive between each tries
- Check the serial adapter communication
- Wrong COM port selected for the serial adapter (DVDKey hardcoded to COM1)
c:\DVDKEY>dvdkey a000
Port A000
Drive Present
Wait about 20 seconds

It didn't work, sorry   reg1: 54
DVD key:
00000000000000000000000000000000
Seems NOT a good DVD Key!!! 00 00
KEY.BIN saved


c:\DVDKEY>
In this case the wrong SATA port address is used. Try iPrep, DOSFlash, or Slax to find the correct port.
c:\DVDKEY>dvdkey a400
Port A000
Problems with sata status, try to reboot PC

c:\DVDKEY>
Spoof Drive
The Xbox 360 system is married to the specific DVD drive when it ships from the factory. Two parts in the DVD firmware is linking it to the 360, the first is the DVD encryption key, e.g. 9174C2D5905AE8B9ACB23CD116XXXXXX, and the second is the drive identity, e.g. PLDS DG-16D2S 74850CA0A1D608CG81881200VM1.
For any games to start at all the key stored in the NAND flash has to match the key in the firmware on DVD drive, else only DVD movies will play.
Earlier drives (Toshiba-Samsung, Hitachi-LG, and BenQ) had the same drive identification string, but the new Lite-On has an unique identifier per drive. This unique identifier is found in the INQUIRY.BIN file.
DVD Key
Have your hacked firmware for the drive you want to use as a replacement for the Lite-On ready. The hacked firmware is found in Benq iXtreme v1.41 for BenQ, Samsung.iXtreme.1.4 for Thoshiba-Samsung, and 360FW-Toolbox-v4.8 or iXtreme1.4_Hitachi for Hitachi-LG.
If you haven't written down the key for the Lite-On during the dump process, download Tiny Hexer and open the KEY.BIN file. The key is in HEX form, here it's starting 9174....
Write down this key and save it to a text file for later reference and backup.
360 Firmware Toolbox (recommended method)
Download and extract 360 Firmware Toolbox v4.8 or newer.
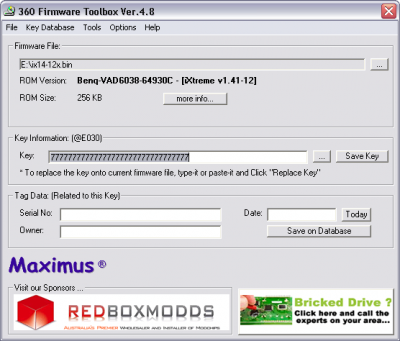
Open 360 Firmware Toolbox, select File and Open, and find the hacked firmware for the new drive. Copy the Lite-On DVD key found above and paste it into the Key field under the Key Information section. Click Save Key to apply the change.
The key is now patched. Next, spoof the drive identification.
Manual method
The key location is different for each drive and firmware version. Use the table below to find the correct location.
= BenQ
Identification String
The identification string for the Lite-On drive is saved to the INQUIRY.BIN file. This file was created during the dumping process.
350 Firmware Toolbox (recommended method)
Download 360 Firmware Toolbox v4.8 or newer and exact it to a folder.
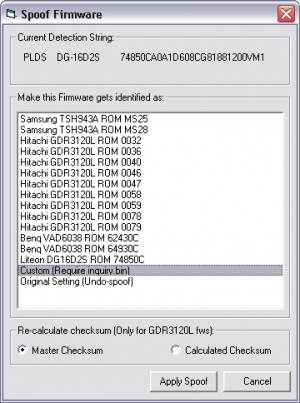
Open 360 Firmware Toolbox and open the hacked firmware for the new drive. Select Tools and Spoof Firmware. In the selection box pick Custom (Requires inquiry.bin) and click Apply Spoof.
In the next file dialog that's popping up, find and select the INQUIRY.BIN file from the Lite-On dump. This file includes the unique identifier for the drive. Click Ok and a message will report the change was made.
To verify and view the unique identifier, select Tools and Spoof Firmware again, and look at the top of window under Current Detection String. This is the real spoof string.
Manual method
Open the INQUIRY.BIN file in Tiny Hexer, select all the 6 lines (ctrl+a), and copy it (ctrl+c).
Next, open the hacked firmware and search for the HEX string 0580 0032. There will be several blocks matching this string. Look at the specific drive below to find the exact location. The identification string is 0x60 bytes long. Mark this range and paste the Lite-On inquiry string into this selection.
BenQ
BenQ identification string is located at 0x2D5C to 0x2DBC, length 0x60 bytes.
Toshiba-Samsung
Toshiba-Samsung identification string is located at 0x20B0 to 0x2114, length 0x60 bytes.
Hitachi-LG
Version 32
Hitachi-LG identification string is located at 0x3D460 to 0x3D4C0, length 0x60 bytes.
No checksum reset.
Version 36
Hitachi-LG identification string is located at 0x3D444 to 0x3D4A4, length 0x60 bytes.
No checksum reset.
Version 46 and 47
Hitachi-LG identification string is located at 0x3D47C to 0x3D4DC, length 0x60 bytes.
Reset the checksum to 0000 0000 at location 0x3E7FC to 0x3E800.
Version 59
Hitachi-LG identification string is located at 0x3D498 to 0x3D4F8, length 0x60 bytes.
Reset the checksum to 0000 0000 at location 0x3E7FC to 0x3E800.
Version 78 - Key location 4B00, 4C30, and 4D20
Hitachi-LG identification string is located at 0x3CAB0 to 0x3CB10, length 0x60 bytes.
Reset the checksum to 0000 0000 at location 0x3E7FC to 0x3E800.
Version 78 - Key location 4E10
Hitachi-LG identification string is located at 0x3CB3C to 0x3CB9C, length 0x60 bytes.
Reset the checksum to 0000 0000 at location 0x3E7FC to 0x3E800.
Version 79 - Key location 4B00
Hitachi-LG identification string is located at 0x3CAB0 to 0x3CB10, length 0x60 bytes.
Reset the checksum to 0000 0000 at location 0x3E7FC to 0x3E800.
Version 79 - Key location 4E10
Hitachi-LG identification string is located at 0x3CB3C to 0x3CB9C, length 0x60 bytes.
Reset the checksum to 0000 0000 at location 0x3E7FC to 0x3E800.
