Film Projects: Difference between revisions
No edit summary |
|||
| (27 intermediate revisions by the same user not shown) | |||
| Line 1: | Line 1: | ||
== Tutorials == | |||
* [[How to get clean greenscreen key]] | |||
== Blue or Greenscreen == | == Blue or Greenscreen == | ||
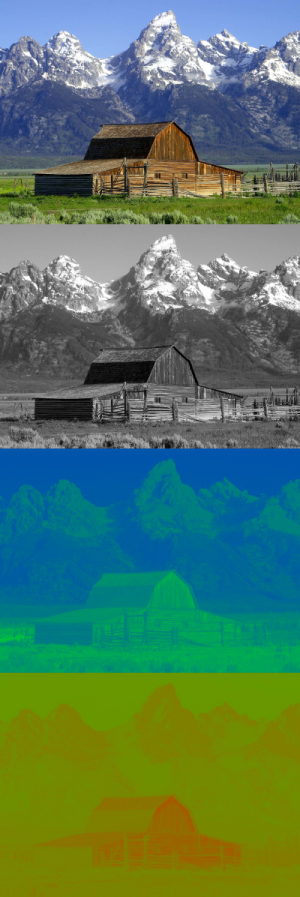
[[Image:YUV.png|thumb|YUV channels: full picture, Y, U, and V]] | [[Image:YUV.png|thumb|YUV channels: full picture, Y, U, and V]] | ||
Aka. chroma key, and color keying. | |||
Key steps [http://www.vfxtalk.com/forum/showpost.php?p=22262&postcount=8]: | |||
* Bright solid even and smooth green colored sheet or wall | |||
* Use softlights or light diffuser away from the background to get an evenly lit screen | |||
* Multiple light sources and diffusers to cancel out hard shadows | |||
* Standing away from the screen for smoother or no shadows and less color spill | |||
* DV cameras has lower chroma (color) resolution, blur channel before key (see below) | |||
=== YUV color space === | === YUV color space === | ||
| Line 11: | Line 23: | ||
YUV is used for analog video and is not an absolute color space, it's a way of encoding RGB information [http://en.wikipedia.org/wiki/YUV#Luminance.2Fchrominance_systems_in_general]. The equivalent abbreviation for digital video is [http://en.wikipedia.org/wiki/YCbCr YCbCr]. | YUV is used for analog video and is not an absolute color space, it's a way of encoding RGB information [http://en.wikipedia.org/wiki/YUV#Luminance.2Fchrominance_systems_in_general]. The equivalent abbreviation for digital video is [http://en.wikipedia.org/wiki/YCbCr YCbCr]. | ||
=== Chroma resolution | === Chroma resolution subsampling === | ||
* 4:4:4 (Y:U:V or Y:Cb:Cr) - full resolution / high bandwidth | * 4:4:4 (Y:U:V or Y:Cb:Cr) - full resolution / high bandwidth | ||
| Line 25: | Line 37: | ||
Chroma subsampling causes nasty problems for film makers trying to do keying with blue or green screening. The chroma interpolation along edges produces noticeable combing artifacts. | Chroma subsampling causes nasty problems for film makers trying to do keying with blue or green screening. The chroma interpolation along edges produces noticeable combing artifacts. | ||
When using Adobe Premiere and Adobe Photoshop, the | When using Adobe Premiere and Adobe Photoshop, the best way is to blur the jaggedness in the UV channels is in Photoshop with 4 pixels horizontal motion blur for NTSC DV (4:1:1) and 2-4 pixel gaussian blur for PAL DV (4:2:0) [http://www.neopics.com/bluescreen/]. Alterntively, dvMatte Pro blurs the chroma channels and keys in one plugin. Sample: | ||
[[Image:Greenscreen | [[Image:Greenscreen subsampling keying.png|400px]] [[Image:Greenscreen subsampling keying dvmatte.png|216px]] | ||
Another problem would be video noise, pixels in dark areas where the camera sensor has a hard time determining the image information. This can only be fixed by good noise reduction filters or ,more preferably, a new camera. | |||
=== References === | |||
"If you can plan your DV shot to have mostly dark subjects (dark hair & clothing) in front of a green screen (or bright/blond subjects in front of blue), you can use the color difference key to pull a quick core matte, then turn to a luma-based solution to bring out the edge details." | |||
"With DV and DVCam, you won't have as much color information per pixel due to compression, so good mattes are harder to pull. It ends up looking pretty aliased. Both NTSC and Pal DV formats have pretty low sampling (4:1:1 for NTSC and 4:2:0 for Pal)." | |||
"It was all pixelated and jagged edges. How do u get around this? The technique that I've heard used most often is that you blur the UV channels (the chromanance part of the YUV) then mix that back in with the Y (luminance) and your ready to pull a matte. Do just enough blur so the pixelated jagged edges soften. Use that only for pulling the matte. Once you've got your matte, go back and use the original footage for applying the matte." | |||
=== Reference sites === | |||
* [http://forums.cgsociety.org/showthread.php?s=cf5bcfd0ef189ceb485eec675f99884d&p=2911287#post2911287 CGTalk GreenScreen] | * [http://forums.cgsociety.org/showthread.php?s=cf5bcfd0ef189ceb485eec675f99884d&p=2911287#post2911287 CGTalk GreenScreen] | ||
* [http://www.pcquest.com/content/multimedia/2004/104070101.asp PCQuest Matte creation in After Effects] | * [http://www.pcquest.com/content/multimedia/2004/104070101.asp PCQuest Matte creation in After Effects] | ||
| Line 51: | Line 59: | ||
* [http://www.computerarts.co.uk/tutorials/3d__and__animation/bluescreen_on_a_budget Bluescreen on a budget] | * [http://www.computerarts.co.uk/tutorials/3d__and__animation/bluescreen_on_a_budget Bluescreen on a budget] | ||
* [http://www.dvguru.com/2006/12/21/tips-for-compositing-dvc-pro-hd-footage/ Tips for compositing DVC Pro HD footage] | * [http://www.dvguru.com/2006/12/21/tips-for-compositing-dvc-pro-hd-footage/ Tips for compositing DVC Pro HD footage] | ||
* [http://cdn4.libsyn.com/macbreak/macbreak20060216-001a-mp4.mov MacBreak HD green screen shooting part 1 - setup] | * [http://cdn4.libsyn.com/macbreak/macbreak20060216-001a-mp4.mov MacBreak HD green screen shooting part 1 - setup] | ||
* [http://cdn3.libsyn.com/macbreak/macbreak20060303-001b-mp4.mov MacBreak HD green screen shooting part 2 - resolutions and color compression] | * [http://cdn3.libsyn.com/macbreak/macbreak20060303-001b-mp4.mov MacBreak HD green screen shooting part 2 - resolutions and color compression] | ||
| Line 57: | Line 64: | ||
* [http://en.wikipedia.org/wiki/Bluescreen Chroma key Wikiepedia Chroma key (Bluescreen)] | * [http://en.wikipedia.org/wiki/Bluescreen Chroma key Wikiepedia Chroma key (Bluescreen)] | ||
* [http://hv20.com/showthread.php?t=5478#post42481 HDV or DV for chroma Keying?] | * [http://hv20.com/showthread.php?t=5478#post42481 HDV or DV for chroma Keying?] | ||
* [http://library.creativecow.net/articles/rabinowitz_aharon/junk_mattes/video-tutorial.php Creative COW Creating Super Tight Junk Mattes] | |||
* [http://www.neopics.com/bluescreen/ Clean DV Bluescreen/Greenscreen Composites] | * [http://www.neopics.com/bluescreen/ Clean DV Bluescreen/Greenscreen Composites] | ||
* [http://www.kenstone.net/fcp_homepage/chroma_key_fcp_hd_monahan.html Chroma Keying in Final Cut Pro HD] | * [http://www.kenstone.net/fcp_homepage/chroma_key_fcp_hd_monahan.html Chroma Keying in Final Cut Pro HD] | ||
* [http://www.dvpa.com/public/537.cfm Basic Motion Tracking in After Effects CS3] | |||
* [http://www.vfxtalk.com/forum/greenscreen-t4756.html VFXTalk GreenScreen] | |||
* [http://forums.cgsociety.org/showthread.php?t=53199 Preblur for DV Keying] | |||
* [http://productions.andrewgentle.com/tutorials/deinterlaced_slow_motion/ Smoother Slow Motion from interlaced footage] | |||
== Programs / Plug-ins == | == Programs / Plug-ins == | ||
| Line 69: | Line 81: | ||
== Lightning == | == Lightning == | ||
Some guidelines: | |||
* Mount lights high, prettier picture | |||
* Use three lights: key light, key fill, and back light | |||
* Bounce light off white wall, aluminum foil, or diffuser paper | |||
* Use the manual white balance settings in the camera | |||
References: | |||
* [http://205.214.76.22/showthread.php3?t=2984 Soft Lightning] | * [http://205.214.76.22/showthread.php3?t=2984 Soft Lightning] | ||
* [http://www.photoflex.com/photoflex/index.html PhotoFlex] / [http://www.photoflexlightingschool.com/Equipment_Lessons/index.html PhotoFlex Equipment Lessons] | * [http://www.photoflex.com/photoflex/index.html PhotoFlex] / [http://www.photoflexlightingschool.com/Equipment_Lessons/index.html PhotoFlex Equipment Lessons] | ||
* [http://www.trustedreviews.com/camcorders/review/2007/10/06/Making-Light-Of-The-Matter/p1 Making Light Of The Matter] | |||
* [http://www.dvinfo.net/articles/lighting/spears1.php Assemble Your Own Low-Budget Light Kit] | |||
* [http://www.dvinfo.net/articles/lighting/hdlightkit1.php Build a Light Kit with a Trip to Home Depot] | |||
* [http://www.videomaker.com/article/12095/ Lighting accessories can be as easy to make as a trip] | |||
* [http://www.camcorderinfo.com/bbs/t136939.html 24P Scripts for Pulldown Removal] | |||
Latest revision as of 21:37, 18 May 2011
Tutorials
Blue or Greenscreen

Aka. chroma key, and color keying.
Key steps [1]:
- Bright solid even and smooth green colored sheet or wall
- Use softlights or light diffuser away from the background to get an evenly lit screen
- Multiple light sources and diffusers to cancel out hard shadows
- Standing away from the screen for smoother or no shadows and less color spill
- DV cameras has lower chroma (color) resolution, blur channel before key (see below)
YUV color space
YUV is used for analog video and is not an absolute color space, it's a way of encoding RGB information [2]. The equivalent abbreviation for digital video is YCbCr.
Chroma resolution subsampling
- 4:4:4 (Y:U:V or Y:Cb:Cr) - full resolution / high bandwidth
- 4:2:0 (Y:U:V or Y:Cb:Cr) - less color resolution / lower bandwidth - PAL DV, HDV
- 4:1:1 (Y:U:V or Y:Cb:Cr) - less color resolution / lower bandwidth - NTSC DV
MacBreak part 2 explains and shows how chroma subsampling works.
Because of storage and transmission limitations, there is always a desire to reduce (or compress) the signal. [3]
The green information is usually preserved in the Y channel [4]. Which makes a green background perfect because of the extra channel resolution on 4:2:0 and 4:1:1 based cameras. In addition green is not a color usually found on human beings, making it easy to key.
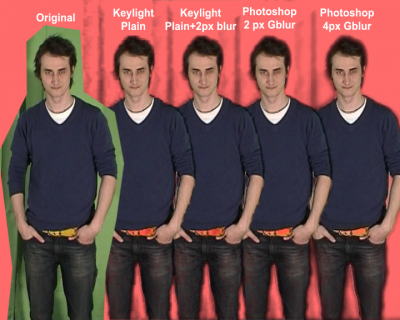
Chroma subsampling causes nasty problems for film makers trying to do keying with blue or green screening. The chroma interpolation along edges produces noticeable combing artifacts.
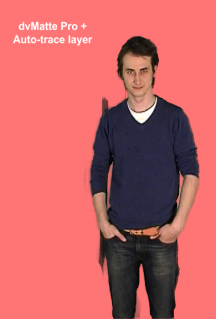
When using Adobe Premiere and Adobe Photoshop, the best way is to blur the jaggedness in the UV channels is in Photoshop with 4 pixels horizontal motion blur for NTSC DV (4:1:1) and 2-4 pixel gaussian blur for PAL DV (4:2:0) [5]. Alterntively, dvMatte Pro blurs the chroma channels and keys in one plugin. Sample:
Another problem would be video noise, pixels in dark areas where the camera sensor has a hard time determining the image information. This can only be fixed by good noise reduction filters or ,more preferably, a new camera.
References
"If you can plan your DV shot to have mostly dark subjects (dark hair & clothing) in front of a green screen (or bright/blond subjects in front of blue), you can use the color difference key to pull a quick core matte, then turn to a luma-based solution to bring out the edge details."
"With DV and DVCam, you won't have as much color information per pixel due to compression, so good mattes are harder to pull. It ends up looking pretty aliased. Both NTSC and Pal DV formats have pretty low sampling (4:1:1 for NTSC and 4:2:0 for Pal)."
"It was all pixelated and jagged edges. How do u get around this? The technique that I've heard used most often is that you blur the UV channels (the chromanance part of the YUV) then mix that back in with the Y (luminance) and your ready to pull a matte. Do just enough blur so the pixelated jagged edges soften. Use that only for pulling the matte. Once you've got your matte, go back and use the original footage for applying the matte."
Reference sites
- CGTalk GreenScreen
- PCQuest Matte creation in After Effects
- DVCreators Green Screen!
- MacRumors Bluescreen on the cheap?
- Bluescreen on a budget
- Tips for compositing DVC Pro HD footage
- MacBreak HD green screen shooting part 1 - setup
- MacBreak HD green screen shooting part 2 - resolutions and color compression
- Wikipedia Chroma subsampling
- Chroma key Wikiepedia Chroma key (Bluescreen)
- HDV or DV for chroma Keying?
- Creative COW Creating Super Tight Junk Mattes
- Clean DV Bluescreen/Greenscreen Composites
- Chroma Keying in Final Cut Pro HD
- Basic Motion Tracking in After Effects CS3
- VFXTalk GreenScreen
- Preblur for DV Keying
- Smoother Slow Motion from interlaced footage
Programs / Plug-ins
- dvMatte Pro - Final Cut Pro, OSX
- Keylight - After Effects
- Shake - OS X only
- Final Cut Pro - OS X only
- Boris Key filters - After Effects, Final Cut Pro, etc
Lightning
Some guidelines:
- Mount lights high, prettier picture
- Use three lights: key light, key fill, and back light
- Bounce light off white wall, aluminum foil, or diffuser paper
- Use the manual white balance settings in the camera
References:

