Victron VE Direct DIY Cable
If you broke or lost the VE.Direct cable for your Victron device, you can make your own. The original cable is a RS232/Serial-to-USB converter. This means that any device that appears as an COM/serial device in the operating system will work for this purpose.
Materials
This requires the following parts:
- Adafruit FTDI 5V 1m adapter cable
- JST-PH 2.00mm pitch 4-pin with wires
Or build one from adapters, cable and connector:
- Sparkfun FTDI 5V RS232 Mini-USB adapter
- Prolific 2303 based adapters also works (thanks Javi)
- JST-PH 2.00mm pitch 4-pin connector
- 4 Wire cable 1m
Connection
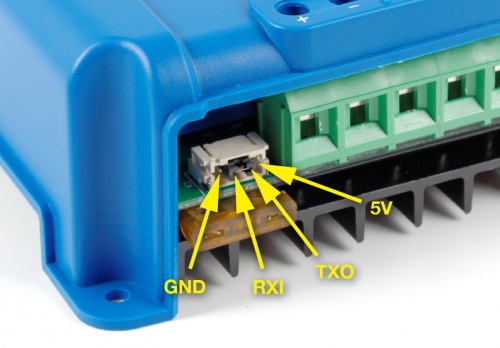
All victron VE.direct products have the same pin-out irrespective of the usual data flow direction. The VE.direct cable is a so called cross cable where RX and TX lines are crossed (thanks Koen).
Connection diagram:
Voltage: 5V - when the Victron solar charge controller is powered by the PV, you can leave the 5V pin unconnected
Pin-out Victron unit:
The communications is RS232 serial based, so the baud rate should be set to 19200 if you like to use a terminal to check the output. No initialization of the BlueSolar unit needed, just battery power connected.
Sample output of the continuous update packet stream for the live page in VictronConnect:
PID	0xA043			-- Product ID for BlueSolar MPPT 100/15
FW	119			-- Firmware version of controller, v1.19
SER#	HQXXXXXXXXX		-- Serial number
V	13790			-- Battery voltage, mV
I	-10			-- Battery current, mA
VPV	15950			-- Panel voltage, mV
PPV	0			-- Panel power, W
CS	5			-- Charge state, 0 to 9
ERR	0			-- Error code, 0 to 119
LOAD	ON			-- Load output state, ON/OFF
IL	0			-- Load current, mA
H19	0 			-- Yield total, kWh
H20	0			-- Yield today, kWh
H21	397			-- Maximum power today, W
H22	0 			-- Yield yesterday, kWh
H23	0			-- Maximum power yesterday, W
HSDS	0			-- Day sequence number, 0 to 365
Checksum	l:A0002000148		-- Message checksum
For the protocol documentation see:
Sniff serial data
If you have an Arduino Mega, you can utilize one of the extra serial ports to listen on the serial stream from the controller. Connect RX to D19 and TX to D18 on the Mega.
Use this code and open the Serial Monitor on baud rate 19200:
void setup() {
  // initialize both serial ports:
  Serial.begin(19200);
  Serial1.begin(19200); // D18 D19
}

void loop() {
  // read from port 1, send to port 0:
  if (Serial1.available()) {
    int inByte = Serial1.read();
    Serial.write(inByte);
  }

  // read from port 0, send to port 1:
  if (Serial.available()) {
    int inByte = Serial.read();
    Serial1.write(inByte);
  }
}
Software
For Windows, download the USB drivers and install VConnect:
For Mac, just download and install VConnect:
Long cable extension
A long distance VE.direct connection can be built by inserting a MAX490 chip (RX&TX to differential line receiver transmitter) using standard CAT 5 cable. A MAX490 PCB is easily available on Aliexpress or Ebay. The Venus GX or ColorGX pinout can also be seen on the Victron document VE_BBB_cape_v0.70_released.pdf. Schematic are on the Venus GX Github pages.
Future
The next project is to try to use a Bluetooth LE serial adapter and try to make it work like a VE.Direct Bluetooth smart dongle.

