ESP8266 Controlled Door Operator: Difference between revisions
Created page with "At our office building, there is a Dorma [www.dorma.com/us/en/products/opening_closing/automatic_swing_door_operators/ed100_250_ansi/index-144-470-2757.html Automatic Swing Do..." |
|||
| Line 10: | Line 10: | ||
== Schematic == | == Schematic == | ||
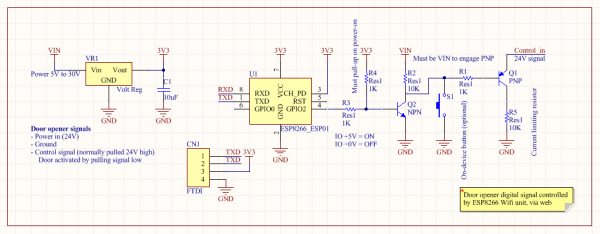
[[Image:Door_operator_schematic.png| | [[Image:Door_operator_schematic.png|600px]] | ||
The system is based on a 3.3V regulator (although I used my own ESP8266 breakout board which has a 3.3V regulator, connected to a 5V regulator capable of handling 24V in), the main ESP8266-ESP01 board and a pair of PNP and NPN transistors. | The system is based on a 3.3V regulator (although I used my own ESP8266 breakout board which has a 3.3V regulator, connected to a 5V regulator capable of handling 24V in), the main ESP8266-ESP01 board and a pair of PNP and NPN transistors. | ||
Revision as of 18:55, 21 November 2015
At our office building, there is a Dorma [www.dorma.com/us/en/products/opening_closing/automatic_swing_door_operators/ed100_250_ansi/index-144-470-2757.html Automatic Swing Door Operator] which is normally engaged by a push button next to the door frame and also wirelessly from the hall way end of the door.
Pressing and waiting for the door to open is unbearable, therefore I made the decision to add a third option to the mix; operating it wirelessly from my mobile phone using the web browser.
Digital switch
The way the wired and wireless buttons are wired on the automatic door operator is fairly simple, just ground and a control signal which is pulled high (24V). Pull this control line low and the door will engage and begin to swing open.
Adding a third option is just a matter of adding a transistor between the control signal and ground; and having a controller toggle the transistor when needed.
Schematic
The system is based on a 3.3V regulator (although I used my own ESP8266 breakout board which has a 3.3V regulator, connected to a 5V regulator capable of handling 24V in), the main ESP8266-ESP01 board and a pair of PNP and NPN transistors.
Code
The code is based on Lua for NodeMCU. This code is just a sample web server code modified to wait 500ms before releasing the pull-low event.
wifi.setmode(wifi.STATION)
wifi.sta.config("WIFISSID","WIFIPASSWD")
print(wifi.sta.getip())
led1 = 3
led2 = 4
gpio.mode(led1, gpio.OUTPUT)
gpio.write(led1, gpio.LOW);
gpio.mode(led2, gpio.OUTPUT)
gpio.write(led2, gpio.LOW);
srv=net.createServer(net.TCP)
srv:listen(80,function(conn)
    conn:on("receive", function(client,request)
        local buf = "";
        local _, _, method, path, vars = string.find(request, "([A-Z]+) (.+)?(.+) HTTP");
        if(method == nil)then
            _, _, method, path = string.find(request, "([A-Z]+) (.+) HTTP");
        end
        local _GET = {}
        if (vars ~= nil)then
            for k, v in string.gmatch(vars, "(%w+)=(%w+)&*") do
                _GET[k] = v
            end
        end
        buf = buf.."HTTP/1.1 200 OK\nCache-Control: no-cache, no-store, must-revalidate\nPragma: no-cache\nExpires:

0\n\n";
        buf = buf.."<html><head><title>ESP8266 Srv</title></head><body><h1>ESP8266 Web Server</h1>";
        buf = buf.."<p>GPIO0 <a href=\"?pin=ON1\"><button>ON</button></a> <a

href=\"?pin=OFF1\"><button>OFF</button></a></p>";
        buf = buf.."<p>GPIO2 <a href=\"?pin=ON2\"><button>ON</button></a> <a

href=\"?pin=OFF2\"><button>OFF</button></a></p>";
        buf = buf.."</body></html>";
        local _on,_off = "",""
        if(_GET.pin == "ON1")then
          gpio.write(led1, gpio.HIGH);
          tmr.delay(500000);
          gpio.write(led1, gpio.LOW);
          elseif(_GET.pin == "OFF1")then
              gpio.write(led1, gpio.LOW);
              elseif(_GET.pin == "ON2")then
        	  gpio.write(led2, gpio.HIGH);
        	  tmr.delay(500000);
		  gpio.write(led2, gpio.LOW);
                  elseif(_GET.pin == "OFF2")then
                      gpio.write(led2, gpio.LOW);
                  end
                  client:send(buf);
                  client:close();
                  collectgarbage();
                  end)
end)
