T-Rex 250 Setup: Difference between revisions
No edit summary |
No edit summary |
||
| Line 10: | Line 10: | ||
[[Image:helicopter_head1.jpg|300px]] [[Image:helicopter_head2.jpg|300px]] | [[Image:helicopter_head1.jpg|300px]] [[Image:helicopter_head2.jpg|300px]] | ||
Once they're level, remove the rotor head and use a swashplate leveling tool on top of the swashplate and adjust the length of the | Once they're level, remove the rotor head and use a swashplate leveling tool on top of the swashplate and adjust the length of the pushrods to perfectly level the swashplate. The leveling tool fits on top of the swashplate and will reveal any gaps on either side of the 3 servo-links. [FIXMELATER] | ||
If everything seem level, use a digital caliper verify and duplicate the length of similar link rods. This will eliminate vibrations and tracking issues even more. | |||
== Tail == | == Tail == | ||
| Line 31: | Line 33: | ||
[[Image:helicopter_stuntmode_pitch.png|300px]] | [[Image:helicopter_stuntmode_pitch.png|300px]] | ||
=== Collective Cyclive Pitch Mixing === | |||
CCPM Setup: | CCPM Setup: | ||
* 3 servo | * 3 servo | ||
Revision as of 21:16, 28 April 2009
This shows the setup of my T-Rex 250 and the experience I've had learning and experimenting with the build. Please visit RC Heli Wiki for an excellent resource regarding helicopter terms and concepts.
Head
The head setup should mechanically be as symmetrical and zero-pitched as possible. The radio should be set to have a straight throttle curve in normal mode before starting the adjustments.
Initially, install the servos and mount a servo arm that's as horinzontal level as possible and if necessary use subtrim to precisely align it. Connect the rods to the swashplate with the length specified in the manual.
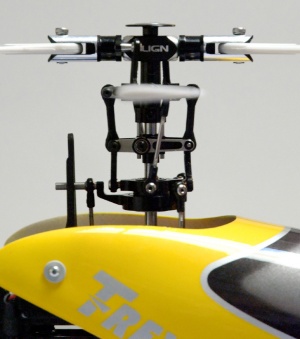
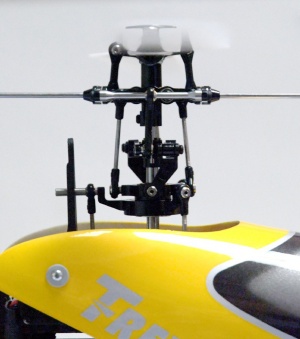
The head is split up in 3 levels (top-to-bottom); Bell-Hiller mixer level, washout arms level, and swashplate level (look at the picture below). On zero-pitch the Bell-Hiller and washout is level. That's determined by the lengths of the link-rods connecting the levels. The washout arms level should be in the middle positioned between minimum and maximum pitch while the arms remain level.
Once they're level, remove the rotor head and use a swashplate leveling tool on top of the swashplate and adjust the length of the pushrods to perfectly level the swashplate. The leveling tool fits on top of the swashplate and will reveal any gaps on either side of the 3 servo-links. [FIXMELATER]
If everything seem level, use a digital caliper verify and duplicate the length of similar link rods. This will eliminate vibrations and tracking issues even more.
Tail
Radio
Pitch/Throttle curves / Dual Rates
A good radio normally has a dual-rate switch on to of the radio for Normal Mode (hovering), Stunt Mode #1 (3D), and Stunt Mode #2 (more power 3D). Stunt mode is also referred to as IdleUp 1 and IdleUp 2. Another mode is Throttle Hold for auto-rotation on engine failure, a second switch is normally used for this.
File:Helicopter dualrate switch.jpg
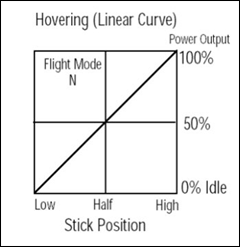
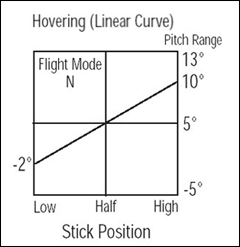
Normal Mode is used during spin-up and hovering. With the stick down the engine will be off and with 70% up the helicopter should be hovering. These parameters are mainly set-up on the radio by altering the engine throttle and rotor pitch curve.
With Stunt Mode turned on the hovering mode is turned into a flexible mode where the helicopter can be flown up-side-down. Essentially the Normal Mode above 50% is mirrored to the 0-49% section of the stick, but with a negative rotor pitch instead. Look at the picture below to understand the difference between Normal and Stunt.
While setting up the curves, there is an option to enable "Exponential". Expo smoothens the curve and stick input will have a finer feel, not that rough.

 File:Helicopter stuntmode throttle.png
File:Helicopter stuntmode pitch.png
Collective Cyclive Pitch Mixing
CCPM Setup:
- 3 servo
- 120° degrees apart
- Swash mix: 40-45%
- Maximum/Minimum pitch: 10.0° (max. 11.0°)
Also known as CCPM. This controls the pitch and movement of the rotor and flybar, thus throttle/pitch (up/down), aileron (left/right), and elevation (forward/backward).
It's called collective because there are 3 servos involved. There are two types of CCPM, mechanical bell crank and electronic mixing. The latter one is used on most helicopters today but requires precision servo setup and some radio configuration. The radio is set-up to mix the 3 servos in order to move the swash plate in the right direction and plane, be it up-down, left-right, or forward-backward.
Gyro
GP750 settings:
- Pulse frame: 1520us
- Servo type: DS (Digital Servo)
- Direction: Rev (mounted up-side-down)
- Servo travel: Limit set with no binding
- Heli type: Small heli
- Delay: 0 delay
The gyro is a device connected between the receiver and the rudder servo, it will stabilize the tail by counter the torque reaction of the main rotor. There are two types, head hold mode continuously tries to hold the tip of the helicopter at a constant angle, while the other mode, rate mode, dampens any external push to the tail. The former is preferred for normal hovering and acrobatics, while the second is mostly used for scale models.
ESC
The default configuration:
- Soft start
- 6v BEC to receiver/servos
Although the ESC is pre-programmed from factory, re-program it to make sure the throttle range matches the transmitter stick range. It also fixes any issues that might be introduced during manufacturing or storage.

