Backup Script
I have multiple local servers and machines I want to backup to one central location. The criteria is that it has to be encrypted, both when transferring and storing, automatic and transparent, redundant and off-line backup. This method is based on Open Source projects.
Previous Routines
A few years ago I found a great way to backup my servers to one central backup server using rsync and ssh. The backup server was located 100 meters away from the location with the servers, connected via wireless lan.
Every server was set up to use keys to login to the backup server without a password, making the process transparent. The rsync process was done over encrypted ssh, making it secure when transferring.
This method worked great and every few problems cropped up, other than lack of free space on backup drives. Both ends (clients and server) had a simple bash script that initiated the mounting of the drives, setting up ssh, including/excludign files, and rsyncing them over. Crontab took care of the scheduling.
Tools
All the tools used are Open Source and distributed free.
- rsync
- Truecrypt
- truecrypt-install
- OpenSSH
- ssh-keyinstall
- netcat
- Cygwin
- netcat, openssh, rsync, nano
Many of these tools have dependencies, but these are the major components. Command-line/terminal will be heavily used to manage, and run this routine.
Drive Setup
The new routing will be based on the previous method but simplified and the disks will be encrypted using Truecrypt.
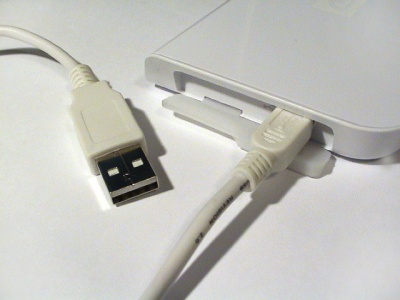
For redundancy I will be using two 250 GB external USB 2.0 bus-powered 2.5-inch hard drives, mine are from made by Western Digital. Both drives are identical and allows me to take one for backup at home (1) while leaving the other at work (2) to backup the servers/desktops.
When I see fit, I can swap the one at home (1) with the one at work (2) (and vice versa) and rsync will take care of the discrepancies by doing a incremental update. The incremental update will find all the new and modified files since the last time it saw that drive (1) and only copy over those files, while at the same time I have a redundant backup of all the files on the other drive (2). The 'freshness' of the redundant files depends on how often I swap out the drives (probably once a week).
Another issue I had was to find a filesystem that allowed for Linux permissions to be stored while still be accessibly by Mac OS X and Windows. After trying to get ext2/ext3 and NTFS to work, I found that, weirdly, HFS+ would be the most compatible filesystem. It was the only fs to have proper read and write, large file, and attribute/permission support. I didn't want to store backups in tar-balls.
Update: The HFS Plus Linux drives has problems with some Linux files or allocation and resulting in an Inode count incorrect error message when trying to fix the problem with Disk Utility. If the problem was not fixed it won't mount at all. The fix was to create to separate partitions, one HFS Plus formatted for the Mac mini files and one Ext3 formatted for the Linux server and Windows client files.
Setting Up Drive
My external hard drive was automatically recognized and the proper modules were loaded without problems by the vanilla 2.6.18-4 Debian kernel. The drive came with one partition that was already FAT32 formatted.
Unfortunately, my motherboard and chipset only support USB v1.1.
Update 2009-09-09: I finally got around to install a new NEC based USB v2.0 OHCI/EHCI PCI card. Everything should backup faster from now on.
To set-up the partitions, use the following procedure:
fdisk /dev/sda
p # show current partitions
d # delete partition(s)
n # create new partition
p # primary partition
1 # partition number
1 # first cylinder
+100000M # 100gb partition
# repeat for next partition
w # write table to disk and exit
Installing Truecrypt
Truecrypt v6.1 and later is a lot easier to build than earlier versions because it used wxWidgets (cross platform programming).
Download wxWidgets (wxAll) and extract the archive.
Build the truecrypt binary:
cd /usr/home/ivc/bin/truecrypt-6.2a-source/
make NOGUI=1 WX_ROOT=/usr/home/ivc/bin/truecrypt-6.1a-source/wxWidgets-2.8.9 wxbuild
make NOGUI=1 WXSTATIC=1
My build halted on a warning: pkcs11.h: No such file or directory error, download the following files into the truecrypt-6.2a root.
wget ftp://ftp.rsasecurity.com/pub/pkcs/pkcs-11/v2-20/pkcs11.h
wget ftp://ftp.rsasecurity.com/pub/pkcs/pkcs-11/v2-20/pkcs11f.h
wget ftp://ftp.rsasecurity.com/pub/pkcs/pkcs-11/v2-20/pkcs11t.h
The final binary should be in the Main directory. Copy it to /usr/bin or /usr/local/bin to make it globally available.
cp Main/truecrypt /usr/bin/
chmod 755 /usr/bin/truecrypt
There might be some package dependency for fuse and device mapper. I had to install fuse-utils in addition to the already installed packages from the Truecrypt 4.3a setup.
Configuring Truecrypt and Drive
Truecrypt settings:
- Normal visible partition encryption
- FAT filesystem, if available
- Hash algorithm RIPEMD-160
- Encryption algorithm AES
- Select a strong password
- No keyfile
To set-up a new drive, use the command truecrypt. The set-up is guided and asks a few questions before setting up the drive for you. Do this for each partition.
truecrypt --quick --create /dev/sda1

Volume type:
 1) Normal
 2) Hidden
Select [1]: 1

Encryption algorithm:
 1) AES
 2) Serpent
 3) Twofish
 4) AES-Twofish
 5) AES-Twofish-Serpent
 6) Serpent-AES
 7) Serpent-Twofish-AES
 8) Twofish-Serpent
Select [1]: 1

Hash algorithm:
 1) RIPEMD-160
 2) SHA-512
 3) Whirlpool
Select [1]: 1

Filesystem:
 1) FAT
 2) None
Select [1]: 1

Enter password: AGOODPASSWD4595
Re-enter password: AGOODPASSWD4595

Enter keyfile path [none]: none

Please type at least 320 randomly chosen characters and then press Enter:
Characters remaining: 174
Characters remaining: 165
Characters remaining: 81


Done: 100,000%  Speed: 28,0 GB/s  Left: 0 s

The TrueCrypt volume has been successfully created.
I choose not to use keyfiles as I'd experiences some problems with them earlier, might work later though. The quick option finishes the format at the end in under a minute. I don't want to hang around waiting for the drive to format when I'm going to re-format it later anyway. Truecrypt will normally randomizes the sectors while formatting the drive making it less prone to obscurity attacks.
Formatting Truecrypt Drive
HFS+
For the Mac partition I reformat the drive as HFS+ aka. the Mac OS hierarchical filesystem.
I used my Mac Mini to format the drive but it's possible to format the drive using MacDrive for Windows too.
- Download the latest Truecrypt for Mac OS X (starting v5.0) and install it the normal way.
- Plug in the USB drive and click 'Ignore' when prompted with an unrecognized drive.
- Open Truecrypt and click 'Select drive'
- Find the USB drive and click Mount.
- Enter the truecrypt password for parition and it will automatically mount on the desktop.
- Open 'Disk Utility' from the Applications -> Utilities folder.
- On the left, pick the mounted drive from the bottom of the list, and click Erase.
- The drive is now ready to be used.
To to mount and dismount the new Truecrypt encrypted drive using terminal commands:
echo -e "\n\n"|./TrueCrypt -t -p <truecryptpassword> -k '' /dev/disk1s1 /Volumes/Backup
echo -e "\n\n"|./TrueCrypt -t -d
Linux has a good hfsplus module that allows read and write. For Windows, MacDrive seems to be a good choice.
Ext3
The Mac HFS+ filesystem doesn't hold all the attributes needed for Linux files, so the Ext3 filesystem is used for backup of Linux and Windows machines.
- Create a new mount point, mkdir /mnt/backup
- Mount the partition, truecrypt -p <truecryptpassword> /dev/sda1 /mnt/backup
- Umount the mount point but not the truecrypt dev mapper device, umount /mnt/backup
- Format the partition, mkfs.ext3 -j /dev/mapper/truecrypt1
- Umount the device using truecrypt, truecrypt -d
Try to mount and dismount the new Truecrypt encrypted drive:
echo -e "\n\n"|truecrypt -p <truecryptpassword> /dev/sda1 /mnt/backup
truecrypt -d
It's also possible to manually use the Truecrypt GUI for all platforms (since v5.0) to select and mount the encrypted drive.
Backup Server Script
The current setup does only uses a simple password to protected a Truecrypt partition. But it's possible to use a key-file as a cihper, it only requires minor changes to the truecrypt commands.
Linux
- Download Linux server package (2009-11-29)
The server script is made on and for Linux, and will work out-of-the box on most systems as long as the default tools (grep, echo, chroot, date, sudo, etc) are available.
Add a backup user that is responsible for the passwordless login and execution of the server script. See #Passwordless Login to setup passwordless login.
adduser -d /usr/home/ivc/bin/rsync-backup-server backupuser
Add the fuse filesystem module to /etc/modules to make sure it is loaded on boot-up.
fuse
The script will change root directory (chroot) to the backup directory (e.g /mnt/backup/elitus/) right before the rsync procedure starts. This strengthens the security and prevents a rouge remote client to gain system access.
su root
apt-get install sudoers
pico /etc/sudoers
# Add this line to allow the backupuser to sudo without a password:
backupuser ALL=(ALL) NOPASSWD: ALL
Now, try this command once one of the clients are set up, the IP address being the backup server.
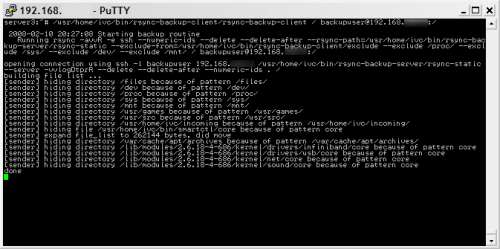
/usr/home/ivc/bin/rsync-backup-client/rsync-backup-client / backupuser@192.168.1.4:/
Nothing has to be executed manually on the backup server, the server script will be executed once the client logs in remotely.
Watch the syslog for errors if the script fails or exits with a rsync error: error in rsync protocol data stream (code 12) at io.c(635) [sender=3.0.3] message.
I noticed that when I updated to OpenSSH 4.3p2 (and later) I had to update the client to the same OpenSSH version that was running on the server. Also run update-locale to generate an empty /etc/default/locale file.
If fusermount complains about a missing /dev/fuse:
Error: fusermount: failed to open /dev/fuse: No such file or directory
The kernel might not have set up the dev-mapping properly. Create a symb-link from /dev/.static/dev/fuse like this:
ln -s /dev/.static/dev/fuse /dev/fuse
Mac OS X
I use a Mac Mini at home as my desktop machine and the machine is set up as the backup server for another server and itself. As Mac OS X is based on Unix and all the Unix tools are available (grep, cut, echo, etc), including rsync.
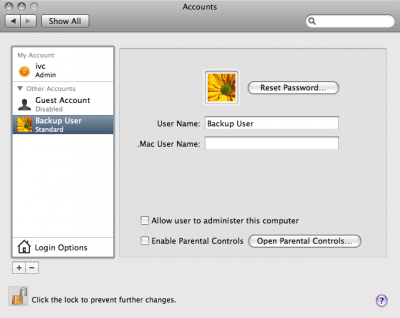
Add a 'Standard' backup user via System Preferences, I called mine "Backup User", short "backupuser".
Add the backupuser to allow passwordless sudo to root, open Terminal:
su (first enable root access in 'Directory Utility')
pico /etc/sudoers
# Add this line:
backupuser ALL=(ALL) NOPASSWD: ALL
When a remote client is setup, use this command on the cleint to backup the entire drive. The IP address being the backup server.
/Applications/rsync-backup-client/rsync-backup-client / backupuser@192.168.1.4:/
As a side note, only a few minor adjustment has to be done to make the backup server script compatible.
- Truecrypt mount and unmount commands are a bit different:
sudo killall -9 hdiutil
sudo umount -f /private/tmp/.truecrypt_aux_mnt1
$ECHO -e "\n\n\n"|/Applications/TrueCrypt.app/Contents/MacOS/TrueCrypt -t -d -f
$ECHO -e "\n\n"|/Applications/TrueCrypt.app/Contents/MacOS/TrueCrypt -t -p backuppassword -k  $BACKUPDEV $BACKUPDIR
- Chroot does not seem to work, possibly because rsync is dynamic not static (requires libs)
Client Backup Script
The backup client script will run without much alteration on both Linux and Mac OS X. Windows is a bit more tricky but it works.
A backup over an ethernet network averaged 2.7 MB/s.
Linux
- Download Linux client package (2009-11-29)
The Linux client script should work with most default Linux distributions.
Mac OS X
The Mac OS X client script works mostly the same way as the Linux version.
Extract and put in /Applications/.
Windows
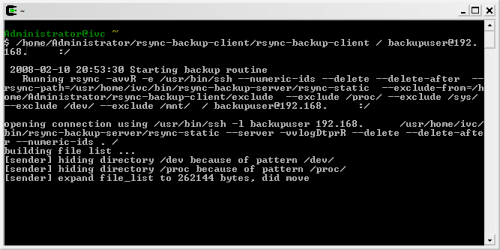
On Windows none of the required tools are installed by default. Fortunately, there is a Unix environment emulator called Cygwin. It works seamlessly with the Windows environment and can be used to run command-line binaries and scripts.
- Download and run the Cygwin setup program.
- Follow the sets to get to the package selection screen and click the 'View'-button once to change to full list view.
- In addition to the default selection, enable netcat, openssh, rsync, and nano in the list.
- Click next and follow through to the end, open the 'Cygwin Bash Shell'.
- Put the ssh-keyinstall and rsync-backup-client scripts in the /home/<Administrator>/rsync-backup-client directory, make them executable, chmod +x ssh-keyinstall rsync-backup-client
- Set up the password-less login, the steps are already mentioned above, ./ssh-keyinstall -u backupuser -s 192.168.1.1 -c 'export SSH_CLIENT SSH2_CLIENT \; /usr/bin/nice /usr/home/ivc/bin/rsync-backup-server/rsync-backup-server windows'
- If asked to set a passphrase, leave it blank
Now, edit the client script settings (backupdir, etc) using the nano editor. To backup files on the Windows drives (c:, d:, etc), the prefered way is to exclude all by default and include only the files and folders you want to backup (opposite the Linux setup). Cygwin makes the Windows drives available under the /cygdrive/ directory.
To backup everything on e.g. the d: and e: drives, run this command:
/home/Administrator/rsync-backup-client /cygdrive/d /cygdrive/e backupuser@192.168.1.1:/
A useful batch script, backup.bat:
@echo off
c:
chdir C:\cygwin\bin
bash --login -i /home/Administrator/rsync-backup-client/rsync-backup-client "/cygdrive/c/" backupuser@192.168.1.100:/
pause
Other important settings
File Inclusion/Exclusion
A normal run will include all files by default and excluded files can be listed in a 'exclude'-file located in the same directory as the rsync-backup-client script. Special files and system devices (dev, sys, proc) are already excluded in the rsync command-line string.
Files to include (normally only / is spesificed to include all files by default):
/usr/home/ivc/bin/rsync-backup-client/rsync-backup-client /usr/home /var/lib /var/log backupuser@192.168.1.1:/
Spaces in the directory name need to be triple escaped or double quoted or a variation, see the rsync FAQ.
Files to exclude (listed in the 'exclude'-file):
/usr/src/
/var/cache/apt/archives/
/usr/games/
Passwordless Login
To automate the remote backup to a central server, login has to be password-less. A good way to do that is to set up ssh to login using keys.
I like to use the ssh-keyinstall tool.
- Download the ssh-keyinstall (local mirror) script by William Stearns.
- Make it executable, chmod +x ssh-keyinstall, and as root run ./ssh-keyinstall -s <192.168.1.1> -u <backupuser> -c 'export SSH_CLIENT SSH2_CLIENT \; /usr/bin/nice /usr/home/ivc/bin/rsync-backup-server/rsync-backup-server server1'
- The script will ask you to provide the password for the specified user to transfer and execute commands on the remote server.
- Once the public keys and settings are set up, you should be able to run the command at the end of the process without being prompted for a login password.
- Next time client logs in to the <backupuser> on <192.168.1.1>, only the command specified in backupuser/.ssh/authorized_keys2 (on the server) will be executed. The rsync-backup-server script takes only one argument, that is the name of the backup directory where rsync will put the files, e.g argument 'server1' will put files in /mnt/backup/server1/current/.
Make sure the authorized_keys2 file has the proper permission so that the backupuser can read the file (it can happen it's owned by root/600). A password-less login can also be setup on the backup server itself, use the same procedure above to set it up.
Automation
Automatic backup is essential for a good backup routine. On Linux, crontab can be used to execute commands on specific times. I like to run the backup scripts when there is little activity, usually that is in the middle of the night.
On the clients I put this line in /etc/crontab to run it at 5 am:
0 5 * * * root /usr/home/ivc/bin/rsync-backup-client/rsync-backup-client / backupuser@192.168.1.1:/
The script will backup the entire filesystem (/) to the password-less user (backupuser) on the backup server (192.168.1.1). For best performance the clients should be scattered on different time slots.
