Difference between revisions of "MakerBot Replicator 1 Firmware Upgrade"
| Line 1: | Line 1: | ||
Updating the MakerBot Replicator 1 firmware requires a bit of patient to get right. It requires exact resetting and uploading timing for the process to start. | Updating the MakerBot Replicator 1 firmware requires a bit of patient to get right. It requires exact resetting and uploading timing for the process to start. | ||
[[ | [[MakerBot Replicator Upgrades]] | ||
== MakerWare firmware upload == | == MakerWare firmware upload == | ||
Revision as of 22:02, 7 June 2016
Updating the MakerBot Replicator 1 firmware requires a bit of patient to get right. It requires exact resetting and uploading timing for the process to start.
MakerWare firmware upload
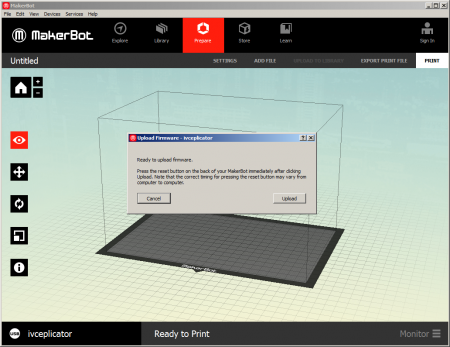
One way, and the easiest, is to update the firmware via MakerWare (as of writing 3.5.0.39). Select Device and Update Firwmare, and follow the instructions.
I could not get the timing right, so I decided to reverse the uploading process and do the update manual using avrdude. See the following section.
Manual avrdude update
Getting the timing right is quite finicy and time consiming. Getting down to the command-line and perform the update manually can save you a bit of time and head banging.
Should work equally well on Windows and OS X, Windows 7 64-bit shown below.
- Open a command-line window, Start, type cmd and enter
- Change directory to MakerWare and avrdude, cd "\Program Files\MakerBot\MakerWare"
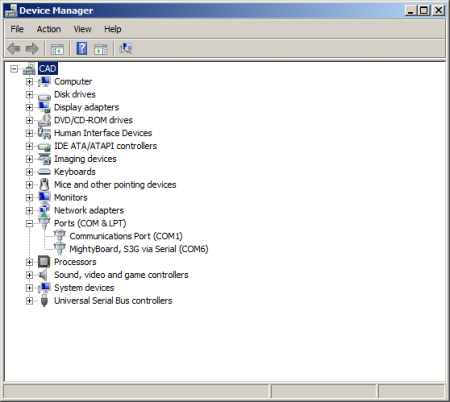
- Power on the Replicator and find the COM-port used, Start, type Device Manage and enter, under Ports find the port

- Get the firmware binary by either
- Starting the MakerWave upload process once and failing (to get the firmware downloaded), then going to \Windows\Temp and searching for *.hex
- Download the firmware version from the links below
- Copy the firmware (*.hex) to "\Program Files\MakerBot\MakerWare"
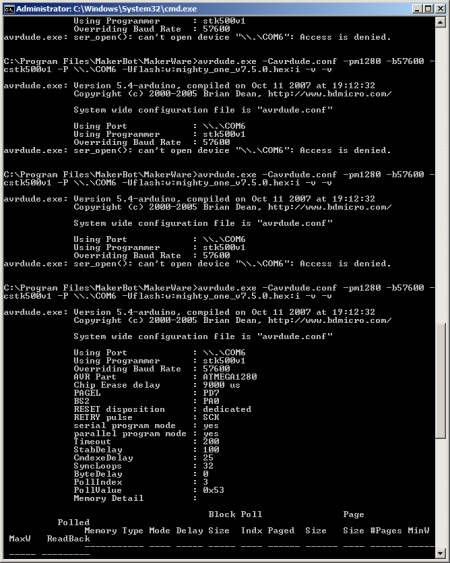
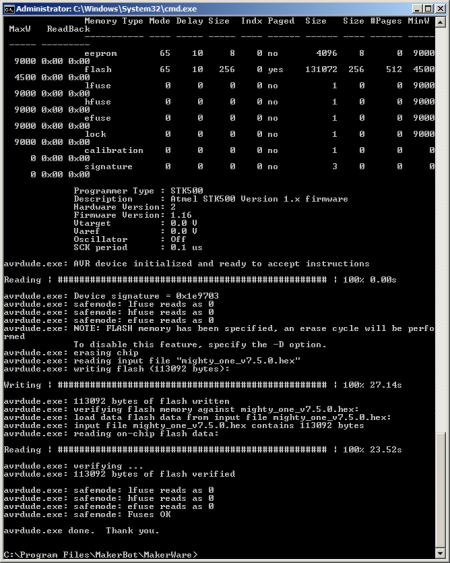
- For Replicator 1/2/2X, execute the upload command, avrdude.exe -Cavrdude.conf -pm1280 -b57600 -cstk500v1 -P \\.\COM6 -Uflash:w:mighty_one_v7.5.0.hex:i -v -v
- Where you change COM6 to your COM-port and firmware file name to your desired one
- Move the keyboard and Replicator to arms reach
- Simultaneously press the Reset button on the back of the Replicator and the enter key on the computer to start the process, if you get "access is denied", it is working, try again
Bootloader
The bootloader provide extra USB/serial flashing functionality.
All the avrdude fuse configurations can be found in the 'dist' directory in the MakerBot MightyBoardFirmware repository or local backup from 2014-08-26.
- ATmega 8U2 - Serial/USB controller:
- ATmega1280 - Main controller:
- Download MakerBot Replicator 1/2/2X bootloader for ATmega1280 main controller - Normal Arduino bootloader, no modifications
To set the fuses (configuration) and flash the bootloader and main firmware, connect a AVR ISP flasher to the right header (1280/8U2) and change "avrisp" to your particular programmer. And "/dev/cu.usbserial-A700dX8R" is the device path for the ISP programmer, change it to yours. I recommend the ArduinoISP if you have a Arduino Uno available.
Replicator 1 serial/usb (ATmega8U2), using Adafruit USBtiny (brown-out changed from 4.3V to 2.7V):
avrdude -F -p m8u2 -c usbtiny -U flash:w:Makerbot-usbserial.hex -e -U lfuse:w:0xFF:m -U hfuse:w:0xD9:m -U efuse:w:0xF5:m -U lock:w:0x0F:m
Or ArduiniISP (didn't work for me):
avrdude -p at90usb82 -c avrisp -P /dev/cu.usbserial-A700dX8R -b 19200 -e -U flash:w:Makerbot-usbserial.hex -U lfuse:w:0xFF:m -U hfuse:w:0xD9:m -U efuse:w:0xF5:m -U lock:w:0x0F:m
It should be identified as "avrdude: Device signature = 0x1e9389".
Replicator 1 main (ATmega1280), using Adafruit USBtiny (brown-out changed from 4.3V to 2.7V):
avrdude -p m1280 -c usbtiny -U flash:w:ATmegaBOOT_168_atmega1280.hex -e -U lfuse:w:0xFF:m -U hfuse:w:0xDA:m -U efuse:w:0xF5:m -U lock:w:0x0F:m
Or ArduinoISP:
avrdude -p m1280 -c avrisp -P /dev/cu.usbserial-A700dX8R -b 19200 -e -U flash:w:ATmegaBOOT_168_atmega1280.hex -U lfuse:w:0xFF:m -U hfuse:w:0xDA:m -U efuse:w:0xF5:m -U lock:w:0x0F:m
It should be identified as "avrdude: Device signature = 0x1e9703".
Firmwares
To flash the main firmware on ATmega1280 boards via the normal USB connector on the MigthyBoard (not ISP header/programmer):
avrdude -F -p m1280 -P /dev/tty.usbmodem-U83 -c stk500v1 -b 57600 -U flash:w:$FILENAME
Change "/dev/tty.usbmodem-U83" to the right device path for your MighyBoard (which really is just the 8U2 serial/usb controller on the MigthyBoard).
Replicator 1 Firmwares
- MakerBot Replicator 1 "Mighty One" v5.1 firmware download local backup download
- Initial firmware release
- MakerBot Replicator 1 "Mighty One" v5.2 firmware download local backup download
- Nozzle Tolerance added to EEPROM. Updated onboard menus. X,Y calibration tool added.
- MakerBot Replicator 1 "Mighty One" v5.5 firmware download local backup download
- Acceleration added to motor motion. Digipot Updates.
- MakerBot Replicator 1 "Mighty One" v6.2.0 firmware download local backup download
- Bug fix release to firmware 6.0. Addresses wavy print issue above 1cm, left extruder prints with makerware.
- MakerBot Replicator 1 "Mighty One" v7.0.0 firmware download local backup download
- Major upgrade to Stepper Motor Smoothness, via the Sailfish team. '.x3g' format introduced. Heaters default to leaving 'preheat' on more of the time.
- MakerBot Replicator 1 "Mighty One" v7.2.0 firmware download local backup download
- Removes support for 's3g' files. 'x3g' is the recognized format. Minor Bug Fixes
- MakerBot Replicator 1 "Mighty One" v7.3.0 firmware download local backup download
- Pause at Z Height, elapsed time displays during prints, minor bug fixes.
- MakerBot Replicator 1 "Mighty One" v7.4.0 firmware download local backup download
- Bugfix release for firmware 7.3. Fixes issues with Z Pause and elapsed print time.
- MakerBot Replicator 1 "Mighty One" v7.5.0 firmware download local backup download
- Bugfix release for firmware 7.4. Fixes issue with Heat Hold.
- MakerBot Replicator 1 "Mighty One" v7.5.5 firmware local backup download
- Latest firmware found on the MakerBot MightyBoardFirmware repository
Replicator 2 Firmwares
- MakerBot Replicator 2 "Mighty Two" v6.2.0 firmware download
- Bug fix release to firmware 6.0. Addresses wavy print issue above 1cm, level build plate script fixed.
- MakerBot Replicator 2/2X "Mighty Two" v7.0.0 firmware download
- Major upgrade to Stepper Motor Smoothness, via the Sailfish team. '.x3g' format introduced. Heaters default to leaving 'preheat' on more of the time.
- MakerBot Replicator 2/2X "Mighty Two" v7.2.0 firmware download
- Removes support for 's3g' files. 'x3g' is the recognized format. Minor Bug Fixes.
- MakerBot Replicator 2/2X "Mighty Two" v7.3.0 firmware download
- Pause at Z Height, elapsed time displays during prints, minor bug fixes.
- MakerBot Replicator 2 "Mighty Two Old" v7.4.0 firmware download
- MakerBot Replicator 2 "Mighty Two Rep2" v7.4.0 firmware download
- Bugfix release for firmware 7.3. Fixes issues with Z Pause and elapsed print time.
- MakerBot Replicator 2 "Mighty Two Old" v7.5.0 firmware download
- MakerBot Replicator 2 "Mighty Two Rep2" v7.5.0 firmware download
- Bugfix release for firmware 7.4. Fixes issue with Heat Hold.
- MakerBot Replicator 2 "Mighty Two Old" v7.5.5 firmware download
- MakerBot Replicator 2 "Mighty Two Rep2" v7.5.5 firmware download
- Firmware found on the MakerBot MightyBoardFirmware repository
- MakerBot Replicator 2 "Mighty Two Old" v7.6.0 firmware download
- MakerBot Replicator 2 "Mighty Two Rep2" v7.6.0 firmware download
- Improves the heating of the Replicator 2X. Following the upgrade, users should reset to factory settings for the changes to take effect.
Every file is also available as a local backup, just put http://ivc.no/makerbot/firmware/ before the file name.
Replicator 2X Firmwares
- MakerBot Replicator 2/2X "Mighty Two" v7.0.0 firmware download
- Major upgrade to Stepper Motor Smoothness, via the Sailfish team. '.x3g' format introduced. Heaters default to leaving 'preheat' on more of the time.
- MakerBot Replicator 2/2X "Mighty Two" v7.2.0 firmware download
- Removes support for 's3g' files. 'x3g' is the recognized format. Minor Bug Fixes.
- MakerBot Replicator 2/2X "Mighty Two" v7.3.0 firmware download
- Pause at Z Height, elapsed time displays during prints, minor bug fixes.
- MakerBot Replicator 2/2X "Mighty Two Old" v7.4.0 firmware download
- MakerBot Replicator 2X "Mighty Two Rep2x" v7.4.0 firmware download
- Bugfix release for firmware 7.3. Fixes issues with Z Pause and elapsed print time.
- MakerBot Replicator 2/2X "Mighty Two Old" v7.5.0 firmware download
- MakerBot Replicator 2X "Mighty Two Rep2x" v7.5.0 firmware download
- Bugfix release for firmware 7.4. Fixes issue with Heat Hold.
- MakerBot Replicator 2/2X "Mighty Two Old" v7.5.5 firmware download
- MakerBot Replicator 2X "Mighty Two Rep2x" v7.5.5 firmware download
- Firmware found on the MakerBot MightyBoardFirmware repository
- MakerBot Replicator 2/2X "Mighty Two Old" v7.6.0 firmware download
- MakerBot Replicator 2X "Mighty Two Rep2x" v7.6.0 firmware download
- Improves the heating of the Replicator 2X. Following the upgrade, users should reset to factory settings for the changes to take effect.
Every file is also available as a local backup, just put http://ivc.no/makerbot/firmware/ before the file name.
Thing-O-Matic Firmwares
Note: Requires Extruder Controller firmware 3.1 or newer.
- MakerBot Thing-O-Matic "Sailfish" v4.1 r720 firmware download
- MakerBot Thing-O-Matic "Sailfish" v4.2 r866 firmware download
- MakerBot Thing-O-Matic "Sailfish" v4.3 r943A firmware download
- MakerBot Thing-O-Matic "Sailfish" v4.4 r1029 firmware download
Every file is also available as a local backup, just put http://ivc.no/makerbot/firmware/ before the file name.


